Friday, December 26, 2014

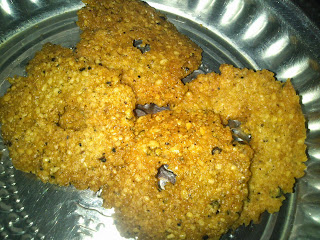
Kadalai mavu and kothumai maavu thattai (Easy wheat & bengal gram flour snack)

Kothumai and kadalai mavu thattai (Easy wheat & bengal gram flour snack) - Preparation time 15 mins
I thought of making some easy snack during a rainy evening. When we were kids mom used to make this maida biscuits (both sweet and spicy). I enjoyed helping mom when she made snacks. I still remember those days when she used to make thattai, maida biscuit, wheat halwa, etc. I tried this one with the readily available flours in home. Surprisingly it came out well and my husband like it. I made in small quantity to try out. It will be good for 2 days max.

Ingredients:-
Wheat flour - 1 cup
Bengal gram flour - 1/2 cup
Ajwain (omam) - 1/ tsp
Salt - to taste
Red Chili powder - 1 tsp (you can increase if you want bit spicy)
Oil - 1 tsp making dough & for deep frying.
Turmeric - 1/4 tsp

Preparation method:-
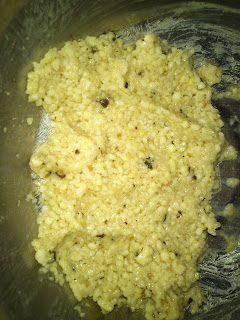
In a bowl add wheat flour, bengal gram, red chili powder, turmeric powder, salt. 1 tsp oil, salt, ajwain and mix well. 
Add required amount of water and make a tight dough like chapathi dough.
Keep the oil in slow flame.
Make balls from the dough. Dust the ball in dry wheat flour and make slightly thick chapathi's.
En - Anubhavam

Using a biscuit cutter or some sharp box lid cut small circular thattais.
En - Anubhavam


En - Anubhavam

Using a small fork make holes in the small thattai's. By this time the oil will be hot. Insert 6 thattai's (one by one and drop carefully in the oil) into the oil. Fry in low flame till the bubble goes of completely.
En - Anubhavam


En - Anubhavam

Transfer this to tissue paper (For me this snack didn't absorb any oil ). 
En - Anubhavam

When cool transfer to air tight box and sever. Easy to make and very quick snack provided flour's are available in home.

Tuesday, December 16, 2014

Curd idiyappam (Thayir idiyappam)

Curd idiyappam (Thayir idiyappam) - Preparation time 15 mins
Make idiyappam using idiyappam flour and idyappam mould (refer to making of idiyappam dough). Steam it in idli cooker for few mins. Color will change slightly when idiyappam is done. Transfer to a plate, leave it to cool. It will be like noodles make it to pieces.

Ingredients:
Curd - 1 cup (To taste good it should not be sour)
Curd pickled chili (more milagai) if available of normal dry red chili - 2 chopped to small pieces
Sesame oil - 1/2 tbsp
Small onion - 4 (peeled, washed and finely chopped)
Salt - as required
Mustard - 1/4 tsp
Carrot - Small piece (washed, peeled and chopped to small cubes)

Preparation method:-
In a kadai add sesame oil, mustard to splutter, spilt chili (dark brown if curd pickled chili or dark red when dry red chili is used).
Now chopped small onion, carrot and sortae along with salt till the raw smell goes of. Switch of the flame.
Add the cooked idiyappam (2 cup), curd in a serving bowl. Mix well till all the ingredients blend with idiyappam.
Very delicious and cool variety of idiyappam. 

Thursday, December 4, 2014

Manjal pattani masala sundal / my version of beach sundal (Dry yellow peas sundal)

Manjal pattani masala sundal (Dry yellow peas sundal) - Preparation time 10 hrs (including soaking time of dry peas)
When i got married and came to in-laws home she made this sundal during some festival. It tasted good and spicy. I just converted little bit healthy and spicy by adding some more spices like ginger, garlic etc along with the ingredients she used. I haven't asked what she will include in the spice powder which she used to add to the sundal. I did this in my way.

Ingredients:-
Dry yellow peas - 2 cup (150 gms) soak overnight and pressure cook with required water & salt for 3 whistle and in low flame for 5 mins.
Red chili powder - 1/2 tsp
Green chili - 1
Garlic pods - 2
Ginger - 1 inch piece
Onion medium size - 2 (chopped to big pieces for grinding)
Turmeric powder - 1/2 tsp
Salt to taste
Sesame oil - 1 tbsp
Fresh coriander - finely chopped.
Mustard seed - 1/2 tsp
Urad dhal - 1 tsp
Saunf - 1 tsp
Cinnamon - small piece
Clove - 1
Amchur powder (Mango powder) or grated mango - 1 tsp (optional)

Preparation method:-
Pressure cook the peas as mentioned above. Remove the excess water and keep which can be used if required.
Grind the ingredients - onion, green chili, ginger, garlic, clove, saunf, cinnamon to coarse paste (might be like crushed soya chunks)
In a kadai heat oil. Add mustard seed, urad dhal, coarse paste, turmeric, red chili powder and soartae well. Raw smell of the ingredients will go off and oil will separate.
Now add the boiled yellow peas, mix gently. Check the spice and salt. At this stage you can adjust by adding salt and chili powder.
Add chopped fresh coriander. and switch off the flame. If you want some slight tangy taste you can add amchur powder at this stage. This will be an yummy, spicy treat for your closed ones. Really you people will love the recipe when you try this out.

Friday, November 28, 2014

Kothamali puli (Coriander leaves with tamarind)

Kothamali puli (Coriander leaves with tamarind) - Preparation time 10 mins
Mom used to make when she buys fresh coriander leaves. This will be very spicy and sour. Goes well with curd rice. Can be refrigerated and used for week.

Ingredients:-
Coriander leaves - 1 bunch (Washed well , remove the yellow leaves, dry the water and chop finely)
Tamarind paste - 1 tsp
Salt - to taste
Sesame oil - 1tbsp
Roasted and powdered red chili  - 1 tsp

Preparation method:-
If you do this using ammi and kozhavi it will be very tasty but, i used mixer because i don't have ammi in my home.
To a kadai add oil and chopped coriander. Sortae for few mins (till the water content goes off) and leave to cool.
In a mixer add coriander leaves, tamarind, salt and red chili powder. NO WATER.
Grind this coarsely. It should not be fine powder. It will be dry and coarse.
You can feel the unique taste of tamarind and chili along with the coriander leave. It will be a good replacement for pickle and easy to make.

Monday, November 24, 2014

Puli Aval (Flattened rice with tamarind)

Puli Aval (Flattened rice with tamarind) - Preparation time 10 mins
When I went to mom's home last month she made it. After returning from market with dad and my nephew we were tired and hungry. Mom gave this snack it was too good, tasty and filling. I tried this in my home when i returned. My husband also liked this snack. You feel filling and light after eating this puli aval. Try i out in next get together.

Ingredients:-
Aval - 1 cup (75 or 100 gms)
Tamarind juice - 1 tbsp
Salt - to taste
Turmeric - 1/4 tsp
Red chili - 3 (Split and remove the seeds if you dont want too spicy)
Mustard seed - 1/4 tsp
Urad dhal - 1/2 tsp
Curry leaves - 5 
Sesame oil - 1/2 tsp
Water - to wash the aval

Preparation method:-
Wash the aval and drain the water (leave few tsp of water to soak the aval). After few minutes the aval will become soft and slightly big than dry aval.
Heat a kadai. Add oil, mustard to splutter, urad dhal to become golden brown. Now add the red chili and roast till it becomes deep red. 
Add the tamarind juice, turmeric, salt to the roasted ingredients. When raw smell of tamarind goes off add the soaked aval and mix well.
Garnish with chopped curry leaves and serve hot.

Monday, November 17, 2014

Wheat and Ragi paratha

Wheat and Ragi paratha - Preparation time 2 hrs
Let us start the week healthy. Last week i thought of making ragi paratha. Usually when we use ragi alone the output might be hard and dry so to make the paratha soft i tried taking 3/4th portion of wheat flour and 1/4th portion of ragi flour. Actually the paratha/chapathi come out well and soft. We consumed hot and straight from tawa so it was good it wont be very soft when it is cool.

Health benefits
As my doctor friend suggested to take ragi more to bring up the vitamin level (b12) up i am thinking different ways to include in our diet. I already gave the ragi dosa recipe in this blog. This is also good for bone. So you can include this partha/chapathi in your weekly menu.

Ingredients:-
Wheat flour - 3/4 cup
Salt - as required
Ragi - 1/4 cup
Water - to make soft dough
Sundrop/vegetable oil - 2 tbsp

Preparation method:-
In a mixing bowl add wheat flour, ragi flour, salt and 1 tbsp oil. Mix all the ingredients well and add required amount of water to make soft dough for paratha.
You have to keep crushing the dough so it will become smooth dough.
Leave the dough to rest for 2 hrs. Make small balls from the dough and spread using rolling pin to paratha's. You can try even immediately but chapathi's will be slightly hard.
It is a healthy paratha (use of oil to cook the chapathi is very less). For this i made manja pattani gravy (dry yellow pea gram gravy)

Wednesday, November 12, 2014

Crispy ulunthu milagu vada(perumalvadai/anjaneyar vadai)

Crispy ulunthu milagu vada(perumal koil/anjanayer vada) my version
A Big thank you everyone for following and reading my blog. This is my 300th post.
We used to make this during puratasi madham when we make mixed rices (pulisadam, thenkai sadam, thayir sadam,etc) along with sakarai pongal to offer lord venkatachalapathy. This will be crispy vada. If cooked properly the milagu vada will be crisp for more than a day. People used to make in different method but i found this method to be easy and quick for me.


En - Anubhavam

Ingredients:-
Urad dhal - 1 cup (Grind to coarse powder i.e. like rava)
Cumin seed - 1 tsp (Grind coarsely)
Black Pepper - 1 tsp (crushed)
Salt - required amount
Water - little
Oil - to deep fry

Preparation method:-
In a bowl mix ground urad dhal, cumin, pepper, salt along with required amount of water. 
Leave the dough to rest for 30 mins so the urad dhal will become soft.
Make the dough slightly loose because urad dhal will absorb some water while resting process
En - Anubhavam

Wet a cloth and spread over on back side of a small plate. Wet your hand and place a smaal ball of ulunthu dough. Flatten to thin circle and pierce a hole in the middle.
You have to be very careful while removing the flatten ulunthu milagu vada and dipping in the hot oil.
Heat the oil and bring down the flame. The milagu vada will be crisp only when cooked in slow flame and it should be cooked slowly to become crispy.
En - Anubhavam

This will be a healthy and tasty snack. 

Wednesday, November 5, 2014

Strawberry & mint jam

Strawberry & mint jam - Preparation time 15 mins.
We used to take orange marmalade and strawberry jam for bread toast. So i want to make strawberry jam in home using fresh strawberries and mint. When i tried out the jam came out well so thought of sharing this recipe with you all. If strawberries are sweet the amount of sugar we add will be less else we have to add more sugar. I haven't added any preservative so jam have to be refrigerated and used if used for more than 2 days. 

Ingredients:-
Fresh strawberries - 15 (cleaned and made into small pieces)
Sugar - 1 cup (or more if strawberry is bit sour)
Mint leaves - 10 

Preparation method:-
In a pan add the strawberry pieces along with mint leaves and start cooking. When it is almost cooked add the sugar and cook.

En - Anubhavam

Check whether the sugar level is enough if not you can add and adjust now.
En - Anubhavam

Cook strawberry, mint and sugar till this becomes thick paste. 
En - Anubhavam

Cool the jam and transfer to a bottle. This goes very well with bread and chapathi.

Friday, October 31, 2014

Vegetable Kuruma (Kuruma kuzhambhu)

Vegetable Kuruma (Kuruma kuzhambhu)  - Preparation time 25 to 30 mins
You can take this kuruma along with plain rice. When mom used to make this kuruma as a side dish for vegetable rice i will take this kuruma with plain rice, because for me this will be very yummy when compared to vegetable pulav :-).

Ingredients:-
Chopped vegetables - 2 cup (carrot, beans, potato, onion - cut to 1 inch pieces)
Garlic pods - 10 (without skin)
Ginger 1 inch piece & 5 garlic - Crushed 
Saunf - ½ tsp
Cinnamon - 1 piece
Clove - 4
Coconut - 4 tbsp
Khuskhus - 1 tbsp
Sesame oil - 2 tbsp
Green chili - 2
Cashew - 3
Sambhar powder - 1 tsp
Turmeric - 1/4 tsp
Salt to taste

Preparation method:-
In a tawa heat oil and add spices (Saunf, cinnamon & clove) roast till brown. Add crushed ginger, garlic paste and fry till raw smell goes off.
Add the slit greenchili, chopped carrot, beans and fry for few mins and add the onion and fry. Finally add the potato and sortae
Add salt, turmeric, sambhar powder slightly fry and add water. Boil the vegetable till it is cooked.
In a mixer grind coconut, cashew, little saunf, khuskus to fine paste. Add this gravy to cooked vegetable and boil. Nice aroma will come and the kuruma will be very colourful. If you want you can increase the spice buy adding more spice.
When mixed with plain rice it will taste very good. Don't forget to deep fry some papad's to take along with this kuruma kuzhambhu for plain rice.

Thursday, October 23, 2014

Coconut burfi (Thenkkai cake)

Coconut burfi (Thenkkai cake) - Preparation time 25 to 30 mins
Mom won't make this sweet during our childhood. Now she made and brought to home it was tasty and i thought of trying it out. One evening. i tried making coconut burfi after getting inputs from mom and friends. The coconut cake came out well and sharing the recipe with you all.

I made this sweet in one of my deepawali. It came out well, smelled very good and also tasted yummy. This is easy to make and the ingredients required to make this sweet will also be available in most of the places so everyone can try this sweet during diwali

En Anubhavam


Ingredients:
Grated and coarsely ground coconut - 1 cup (Use same measuring cup to measure sugar)
Sugar - 1 cup 
Cashew - 10 (broke to small pieces)
Cardamom - 3 (crushed or powdered)
Water - little
Ghee - 2 tbsp

Preparation method:-
Grate and grind the grated coconut coarsely so the cake will look good.
In a vessel add sugar and little water. Make a one string syrup by boiling the sugar and water.
En Anubhavam

To check the string consistency take the syrup (careful because it is boiling and hot) on thumb and press with the next finger when you try to stretch one string will appear.
In a plate grease 1tbsp of ghee and keep.
Switch on the stove and keep a thick kadai add sugar syrup, grind coconut and keep stirring using a ladle.
Keep on stirring till the whitish bubble start coming. Add the powdered cardamon, broken cashew.
En Anubhavam

Pour the thick coconut sugar mixture in the greased plate spread by shaking the plate and leave to slightly cool.
En Anubhavam

When it is mildly hot grease a knife with little ghee and make pieces.
En Anubhavam

You can remove the pieces only when the burfi is completely cool or it will break.
En Anubhavam


Note: My Mom suggested to add little milk to in initial stage with grind coconut and sugar syrup so the cake will be thick white instead of glossy transparent colour. Next time when i make i thought of trying that.

Wednesday, October 15, 2014

Mint pulavo (Pudina pulavo)

Mint pulao - preparation time 20 mins
One day i got up late and only less time to prepare lunch for my husband. I thought of making simple pulavo with mint. It took very less time as the ingredients used for making this recipe is less and readily available in our home.

Ingredients:-

Fresh Mint - 1 cup
Fresh coriander - 1/2 cup
Cashew - 8 (finely chopped  and roasted in ghee)
Ghee - 2 tbsp or according to your taste
Sesame oil - 4 tsp
Green chili - 1 or 2 (slit and keep)
Onion - 1 (chopped to thin strips)
Garlic pods - 10
Salt - to taste
Rice - 1 cup (i used ponni raw rice so 1:2.5 ration rice:water)
Water - 2.5 cup
Bay leaf -2
Clove - 1

Preparation method:-
In a tawa add ghee & oil to heat. Add the spices (bay leaf, clove) and roast till flavor comes (do it in medium or slow flame).
Now add garlic pods, onion, green chili and fry till onion is cooked.Half cup of mint leaves and coriander is added and fried till nice aroma comes.
Add washed rice and fry for few mins, to this add water, salt and mix well. When this boils, transfer to a vessel and pressure cook for 5 whistle and leave it to cool.
Mix the remaining fresh mint leaves with cooked pulavo and transfer to serving bowl. Garnish with roasted cashew.
Simple, easy to make and tasty mint pulavo. When i tried my husband liked this dish very much. You can serve with onion raitha & fried pappads.

Sunday, October 12, 2014

Boiled peanut

Making of boiled peanut (Vegavaitha veerkadalai) .

Buy fresh groundnut (we will get the groundnut with outer shell i will use that groundnut) from vegetable shop. Wash well in running water 2 or 3 times to remove the mud.

In a pressure cooker add washed groundnut, water (till the groundnut's are immersed) and salt 1/2 tbsp for 1/2 kg of groundnut . Pressure cook for 2 or 3 whistle (when groundnut's are very tender 2 whistle is enough else go for 3).

Bring down the flame and cook for few mins and switch of the stove.

Remove the water and serve this will be tasty and healthy snack.

Curry leaves powder (Karuvepillai podi )

Curry leaves powder (Karuvepillai podi ) - Preparation time 15 mins
Mom used to make this podi when she get fresh curry leaves from market. After when she moved to native we have lots and lots of curry plants in backyard so she used to make this podi frequently and brings when she visits me and my brother. I once tried differently from her method it came out well. I suggested her she told this method is much more delicious and she stared following it. Hmm i am also able to satisfy elder people :-)

Ingredients:-
Curry leaves - one bunch or two handful
Urad dhal - 2 tbsp
Red chili - 10
Sesame oil - 1 tbsp
Salt - to taste

Preparation method:-
Clean the curry leaves using water and remove the water content buy spreading over dry cloth. Curry leaves should not be wet.
In a kadai (use iron kadai for all the roasting purpose which is health way of cooking) add few drops of oil and add 1/4 portion of curry leaves. Roast the leaves till they become bright green and crisp. Always use low or medium heat for cooking.
Remove the roasted leaves and keep separately. Using this method roast all the curry leaves.
To the same kadai add urad dhal and roast till golden brown(you can smell the nice aroma when the dhal is roasted). Remove the dhal and roast the red chili till it is crisp and dark red in colour.Leave the ingredients to cool down.
In a mixer grind the roasted red chili and remove a table spoon the red chili powder (because if the podi becomes very spicy it will be difficult to consume). Add the roasted urad dhal, curry leave and salt to mixer and ground to coarse powder (before to fine powder stage)
If you want the spice level little bit more now you add the removed red chili and use whipper button to mix the curry leaves podi well.

Friday, September 26, 2014

Milagu & Jeeragam idiyappam (Pepper & Cumin seed idiyappam)

Milagu & Jeeragam idiyappam (Pepper & Cumin seed idiyappam)- Preparation time 10 mins
Make idiyappam using idiyappam flour and idyappam mould (refer to making of idiyappam dough). Steam it in idli cooker for few mins. Color will change slightly when idiyappam is done. Transfer to a plate, leave it to cool. It will be like noodles make it to pieces.

This is healthy and spicy idiyappam is really easy and quick to make. The ingredients used will be available in your home. Even when kids are not well they like this idiyappam. Easy to digest and also taste good.
En Anubhavam


Ingredients:
Coarsely ground pepper  - 1 tbsp (or as your taste you can increase the spice)
Coarsely ground cumin/jeera - 1tbsp
Ghee - 2 tbsp
Salt - To taste

Preparation method:-
In a kadai add ghee and roast the pepper and cumin along with salt in a low flame. 
When roasted nice aroma comes.
Switch off the flame add the cooked idiyappam.
En Anubhavam

Mix well and check the salt.
This will be a quick and easy breakfast recipe. Really kids will love this healthy dish.

Tuesday, September 16, 2014

How to make ghee from butter

How to make ghee from butter
Home made Ghee

En Anubhavam


After marriage only I tried making ghee from butter by myself. Usually mom used to do all these cooking as usual.
I just want to share my childhood memories on butter and ghee.

We used to watch the whole process from getting cow's milk to the end product ghee during annual holiday's in native place. Now I don't see much people have cow and preparing home made product's as our grand parents did. It will be interesting to watch when grandpa/ my mom used to get milk from cow/buffalo. The milk will be warm and tasty when consumed raw.

Milk used to be fresh and thick, grandma used boil the milk and leave it to cool. When the milk is slightly hot add curd and leave for fermentation (approximately 8 to 10 hrs).
Early morning she used to put the curd in a pot and start churning with the help of wooden churner and rope.

After several hours of churning the butter will start floating above the curd as small balls. Grandma will dip her hand in a clean water and start collecting all the small balls roll to a single big ball. This fresh butter will be served during our morning breakfast (i.e. soft idli hmm those are lovely childhood days). Remaining butter will be melted to ghee (We miss our grandparents and the golden happy days).

You melt the butter for 1 week so that the ghee will be fresh. Take a clean pan and in low flame start melting the butter. When the butter starts to melt it will be sticky and creamy.
En Anubhavam

For 10 mins the spluttering sound will come as the water content in the butter gets removed (evaporates). The butter will become as below.
En Anubhavam
When the water sound is reduced the melted butter will start producing small bubbles and bubbles will start increasing.
En Anubhavam

Keep on stirring and check whether the small particles in the bottom of ghee is start changing to brown colour ( you can check using the ladle with which you are stirring).
En Anubhavam

Switch of the flame when it is slightly brown it will become dark in the cooling process. When ghee is done the nice aroma will also come. 

Note: if you think that the pan is too hot even after switching and it will burn the ghee or make it dark don't worry or panic transfer the ghee to a container. In a large bowl take little cold water in this container keep the ghee container (the container will be hot so take care) so the heat in ghee will be reduced and ghee will be in good condition.

Sakkarai naeyi idiyappam (Sugar, ghee & coconut idiyappam)

Sakkarai naeyi idiyappam (Sugar, ghee & coconut idiyappam) - Preparation time 10 mins
Make idiyappam using idiyappam flour and idyappam mould (refer to making of idiyappam dough). Steam it in idli cooker for few mins. Color will change slightly when idiyappam is done. Transfer to a plate, leave it to cool. It will be like noodles make it to pieces.

This sweet idiyappam is really easy and quick to make. The ingredients used will be available in your home.

Ingredients:
Sugar - 3 tbsp (or extracted from 1 lemon)
Cashewnut - 4 (broken to small pieces) 
Ghee - 2 tbsp
Grated coconut - 2 tbsp
Cardamon - 2 (powdered)

Preparation method:-
In a kadai add ghee and roast the cashew nuts to golden brown.
Switch off the flame add the cooked idiyappam, sugar, ghee, grated coconut and mix well.
This will be a quick and easy breakfast recipe. Really kids will love this dish.

Thursday, September 4, 2014

Vazhakai podi (Plantain dry podi for rice)

Vazhakai podi  (Plantain dry podi for rice) - Preparation time 15 mins
Mom used to make this podi when she make pulikuzhambu. The combination to this will be very good along with deep fried rice vadagam. Nothing stands before this combination. I wonder how our ancestors had made wonders in cooking. Each and every dish differs from other in any one way. One simple thogayal along with fried papad or a curd rice with pickle.....hmm
En - Anubhavam

My friend kavitha's (one of the) favourite dish.

Ingredients:-
Plantain - 1 (Peel the skin, chop into small cubes and keep in water to avoid becoming brown)
Small onion - 15 (peeled and chopped)
Sesame oil (nalla ennai) - 2 tbsp
Urad dal - 2 tbsp
Toor dal - 2 tbsp
Salt - to taste
Water - to sprinkle
Red chili - 4 (remove the seeds if you don't want the dish to be hot)

Preparation method:-
Heat a kadai add toordal, urad dhal with little oil. When it is turning color add red chili along to dhal. When roasted transfer to a bowl to cool.
En Anubhavam

Now add the chopped plantain, small onion, sesame oil and fry for few mins. Sprinkle little water so the plantain will be cooked well.
En Anubhavam

In a mixer add roasted dhal, red chili and salt.

Grind to coarse powder, add roasted and cooked plantain. Use whipper button to ground and mix the plantain, small onion, urad dhal and chili.
En - Anubhavam

If you prepare using ammi and kozhivi it will be excellent in taste.
Take this podi along with white rice and sesame oil. Taste good when you consume along with roasted papad and pulikuzhambu. 

Wednesday, August 27, 2014

Making of idli/dosa flour

Making of idli/dosa flour
I used to add 1 tbsp of vedayam for ordinary idli/dosa flour also because vendhayam is very good for health. The slight flavour of vendhayan will be present in the idli/dosa you make.

Ingredients:-
Boiled rice - 4.5 cup
Urad dal - 1  cup (urad dal should be whitish then only it is fresh)
Vendayam - 1 and 1/2 tbsp
Salt - as required

Preparation method:-
Wash the boiled rice 3 times well in water and soak in water (till the rice is soaked and water remains 2 inch above the rice) for 4 hrs.
Separately wash the urad dal and vendayam together. Soak in water for 3 hrs.
Grind the soaked rice well along with required amount (till it is smooth. when pressed between figure it will be smooth and slight texture will exist). Don't add more water the batter has to be thick.
Grind soaked urad and vendayam. Add water little by little then only the flour will be fluffy and large amount will come.
Mix the ground rice flour and urad flour together with required amount of salt (usually i use my handfull of rock salt and mix).
Leave this flour to ferment for 6 to 8 hrs (according to your  temperature).

Tuesday, August 26, 2014

Thenkai and sarkkarai poorana kozhukattai

Thenkai and sarkkarai poorana kozhukattai
Mom used to make this colourful kozhukattai. It is very easy and simple to make this pooranam and kozhukattai. Everyone can try it out. Prepare kozhukkattai mavu as specified in making of idiyappam flour. or you can use the dry or processed idiyappam mavu to make the kozhukkattai

Making of thenkai and sarkkarai pooranam
Very simple to make

Ingredients:-
Sugar - 1/2 or 3/4 cup (according to your taste)
Kesari colour - a pinch
Half coconut - grated 
Cardamon - 4 (powdered)
Water - little to melt sugar
Ghee - 1 tbsp

Preparation method:-
In a heavy bottom pan add, sugar, keasri powder, water and melt. When the sugar syrup is stick add the grated coconut, powdered cardamon and mix well.
When almost the water content is gone it will become thick. Transfer to a bowl and cool it.
The pooranam will become even thick and tight as it cool so take care.


Making of kozhukattai with sugar pooranam filling
For making of kozhukattai flour refer making of idiyappam/kozhukattai . When the kozhukattai flour is made cover with a wet cloth so that the flour won't become dry or break when the kozhukattai is made.

Ingredients:-
Sesame oil - little to make kozhukattai

Preparation of method kozhukattai:-
Apply little oil in your hand and make small balls using the flour.
In a clean and dry plantain leaf (keep shiny portion of the leaf up) apply little oil so the kozhukattai won't stick to the leaf. If you don't have plantain leaf use some thick silver foil of plastic sheet.
Place the kozhukattai flour ball and flatten to thin circle. Keep one tsp of sugar pooranam in the middle of the circle and cover the pooranam. Now it will become a semi circle like protector and close the edge well so the pooranam won't come out.
Boil water in the idli cooker . In the idli plate apply the sesame oil and place all the kozhukattai you made separately (so it won't stick with one another when cooked).
When water in idli maker boils keep the idli plates inside and close. It will take 5 to 10 mins to cook. When cooked the kozhukattai outer flour will become slightly transparent and shiny/glossy.
Leave it to cool and remove from the idli plate very carefully because it will be very soft and will break very easily.
You can try different shape . Don't worry even it it break's first time it will come out well in next set or next time. The main thing is taste which will be very excellent for sure.
Enjoy your tasty coconut, sugar pooranam kozhukattaiwith your friends and family. If you open the saffron colour pooranam will look gorgeous.

Saturday, August 23, 2014

Vellam Pooranam kozhukattai

Vellam Pooranam kozhukattai - Preparation time 2 hrs
During vinayagar chathurthi we used to make this kozhukattai. Early morning we used to get up and make the pooranam and keep for making kozhukattai. The outer flour for kozhukattai is made as specified in idiyappam.

Making of vellam, kadalai parrupu pooranam
Ingredients:-
Bengal gram - 1 cup (100 to 150 gms)
Jaggery - 1 ball (when crushed will come to 1 heap cup)
Half coconut - grated 
Cardamon - 4 (powdered)
Water - 1/2 cup to melt the jaggery
Sugar - 2 tbsp
Ghee - 1 tbsp

Preparation method:-
In a heavy bottom pan boil water (3 cups). Add washed begal gram till it becomes soft when crushed with hand. One tip to know whether the kadalai paruppu (bengal gram) is cooked well is to check whether the center portion of the dhal is not white.
When cooked remove the excess water and cool it.
Add water to crushed jaggery and melt. Filter and remove the dirt from the jaggery syrup.
Boil the syrup till it is thick. Add grated coconut, boiled channa dhal, cardamon and cook for few mins.
Cool the above mixture and grind to soft paste. Add this to heavy bottomed pan along with ghee and sugar. Cook till the mixture is thick. Take care because when we cool it will become more thick.
Make small balls using the pooranam (size of small gooseberry/ nellikai).

Making of kozhukattai with pooranam filling

Ingredients:-
Sesame oil - little to make kozhukattai

Preparation method:-
For making of kozhukattai flour refer making of idiyappam/kozhukattai . When the kozhukattai flour is made cover with a wet cloth so that the flour won't become dry or break when the kozhukattai is made.
En Anubhavam

Apply little oil in your hand and make small balls using the flour.
In a clean and dry plantain leaf (keep shiny portion of the leaf up) apply little oil so the kozhukattai won't stick to the leaf.
Place the kozhukattai flour ball and flatten to thin circle. Keep the pooranam ball in the middle of the circle and cover the pooranam.
En Anubhavam

Now it will become a semi circle or make to sphere and close the edge well so the pooranam won't come out.
En Anubhavam

Boil water in the idli cooker . In the idli plate apply the sesame oil and place all the kozhukattai you made separately (so it won't stick with one another when cooked) or wet a cloth and place over the idli plate (in mine holes will present idli plate ) and keep the kozhukattai.
When water in idli maker boils keep the idli plates inside and close. It will take 5 to 10 mins to cook.
En Anubhavam

When cooked the kozhukattai outer flour will become slightly transparent and shiny/glossy.
Leave it to cool and remove from the idli plate very carefully because it will be very soft and will break very easily.
En Anubhavam
You can try different shape . Like coconut which they will say modhagam.
Don't worry even if it break's it will be very soft and tasty.. The main thing is taste which will be very excellent for sure.
Enjoy your tasty pooranam kozhukattai with your friends and family.

Omam paratha (carom seeds/bishop's weed/ajwain)

Omam paratha (carom seeds/bishop's weed) - Preparation time 15 mins
Some people won't like the smell of omam but it is really good for health. Can be consumed as seeds also. I tried adding omam to wheat flour and made paratha. It smelled good. Omam is good for digestion. Try out if you like the taste you can make this paratha.

Ingredients:-
Omam seed - 1 tbsp
Wheat flour - 3 cup
Salt - to taste
Vegetable oil - 2 tbsp

Preparation method:-
In a mixing bowl add the wheat flour, hand crushed omam, salt, 1 tbsp of oil. Blend all the ingredients well. 
Add required amount of water to make slightly tight dough (the dough you usually used to make for chapathi) i.e. not sticky and tight like puri dough.
From this dough make small balls and round paratha. Heat the tawa and cook with little oil. It smells very good and easily digestible because of the spice omam.

Thursday, August 14, 2014

Carrot Rava Kesari

Carrot Rava Kesari - Preparation time 20 mins
I thought of making rava kesari, but without using the artificial kesari colour. Saffron (kumkuma poo) is very costly so, i thought of using carrot to bring that yellowish orange colour. I tried of in a little quantity to findout how the colour comes. It looked and tasted good. Colour won't be like the artificial colour anyway this will be an healthy dish. While eating this kesari occasionally you will get the taste and bite of carrot. Happy Independence day.
En - Anubhavam

Ingredients :-
Small rava - 1 cup (keep the same cup for all (sugar, carrot, water) measurements)
Sugar - 2 cup
Water - 3/2.5 cup
Ghee - 1/2 to 3/4 cup
Grated carrot - 1/2 cup
Cashew - 1 tbsp
3 Cardamon powdered

Preparation method:-
In a kadai add 1 tbsp of ghee, grated carrot and fry till the raw smell of carrot goes off. Transfer to a bowl and keep.
In same kadai roast the rava with 2 tspn of ghee till it changes colour to light brown. Take care and don't burn it. Try to do in low flame.
When nice aroma comes and rava is roasted, add the fried carrot, measured water and boil. The rava will absorb all the water and become thick.
Add measured sugar, cardamon powder and cook. The rava will become thick and starts getting shiny look from sugar. Slowy keep adding the ghee and mix.
Roast cashew in ghee and garnish. Turn of the flame when it becomes thick. It will become dry when it starts cooling.Carrot rava kesari is ready try out. You might like this sweet.